Showing posts with label Holiday 2016. Show all posts

Wednesday, 26 October 2016

TWO DEER OPEN SLEIGH


Bonjour et Hello,

 I've seen some wonderful ideas for the Santa's Sleigh Thinlits and 
chose to CASE Tracy's Santa's Sleigh. 


My version, I created a side, so if I decide to put something inside it won't slide out.


Merci et Thank you for dropping by!


Friday, 7 October 2016

PUNCH ME BABY, ONE MORE TIME.....

Bonjour et Hello


Remember when I enclosed this template?

Here is the info on how I created my  template for my coordinating stamps and punch bundles


Label your template with "front" before punching your card stock


Place card stock all the way into the punch until the paper stops at the back of the punch


 We use the "FRONT" side only


As you can see, when I have my  clear-mount block down and the stamp image facing up

the images are "mirrored"
 but it will all be fine because when you stamp on your card stock,
 it will be correct lining up the punch

Now you have the perfect placement of your stamp to ink up and stamp with


  I like to place my stamp block on the table with the image  and place my ink onto the image
 this way I can control the pressure of the ink pad and see how much ink is on the image 


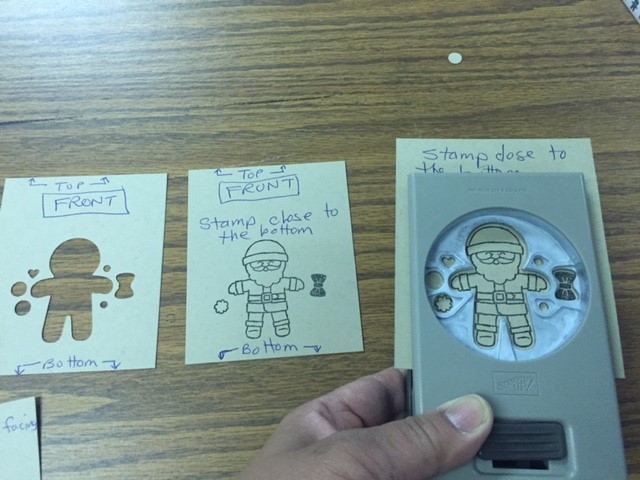
Line up the image and punch!


Make sure you stamp close to the bottom edge of the cardstock
If it is too far up from the bottom  you won't be able to align the punch


 Voila, here is my template ready to use when ever I want to match my image to my punch


Bundle away and punch away to make templates for your co-ordinating stamps and punches!


Merci et Thank you for dropping by!


Thursday, 29 September 2016

TIPPING THURSDAY - MATCHING BUNDLES

Bonjour et Hello!

I thought I would give you a TIP on Thursday!

I am a BUNDLER!  

I love purchasing stamp sets and their coordinating Punch, Framelits or Thinlits.
Who doesn't like to save 10% when purchasing both items!

I saw Connie's wonderful tip for matching your stamp sets with your bundle


 Label what the matching cutting tool you would use with the set.
 P= Punch
T = Thinlits
F = Framelits


I use the Labeler Alphabet Stamp Set  (how appropriate!), 
Uninked Stampin' Spots and loaded  it up with the Real  Red ink  refill.
Once you stamped your letter, you need to let the ink set
 The insert  is very glossy and will tend to smear the ink.
 If you can't wait, blot it with a paper towel, Kleenex or anything that will absorb the ink.


I enclose a template so I can line up my images with my blocks.......
that's for a future post!

Did you notice the dots on the spine of my case?
They are to quickly identify which season that stamps are.
Green dot - Christmas
Orange dot - Fall/Halloween
and so on. 


Here is what it would look like on my shelf.

Here is a fun game.......kind of like "Where's Waldo"
Can you find which stamp sets that I still need to work on....?


See anything you like......just CLICK on to the product you want and
 you go directly to my online store:


Merci et Thank you for stopping by!


Wednesday, 21 September 2016

EVOLUTION OF SANTA


Bonjour et Hello,

Welcome the Seashore Stampers Blog Hop.  The theme for our hop is new Christmas
holiday catalogue and hightlight a product that we enjoy.

I am having lots of fun with the 
Cookie Cutter Christmas and Cookie Cutter Halloween Stamp sets


Real Red CS: 8-1/2" x 5-1/2"  score at 4-1/4"
Whisper White CS: two  5-1/4" x 4  and a strip of  5-1/4"  x  2-1/4"
Basic Black CS:  5-1/4' x 2-1/2"
Used dimensionals on the brim of the hat and pom pom
I added points to the elf's shoes


See anything you like......just CLICK on to the product you want and
 you go directly to my online store:


Be sure to hop on over to the next blog (there are 6 participants)!


                       JEAN                                                                                     SABRINA


Merci et Thank you for stopping by!